Setting a PostgreSQL server for the European Pollen Database (EPD)
In this vignette we will explain and illustrate how to install a PostgreSQL server in Windows and Ubuntu, and how to mirror the European Pollen Database (EPD) into the server. The general procedure include the next steps:
- Download and install PostgreSQL server
- Download EPD data for PostgreSQL
- Setup PostgreSQL for EPD:
- Create mandatory users for EPD
- Create a database for EPD into the server
- Dump EPD data into the new database
Download and install PostgreSQL server
The first step is to download and install the PostgreSQL server. This step changes depending on your operating system (OS). Select your OS in the tabs below.
Windows
You can download Windows binary files of PostgreSQL server latest version, which include the graphical interface pgAdminIII, from https://www.postgresql.org/download/windows/. Currently (2016/06/13), there are two providers: EnterpriseDB and BigSQL. BigSQL provides a much richer installation of the server with a lot of complements that are intended for developers and that will be useless for a low profile user. Hence, I recommend to use binary files from EnterpriseDB. The file name should looks like postgresql-XXXX-windows-YYY.exe (Xs indicate the version number and Ys the computer architecture: x86 or x64).
[caption id=”attachment_536” align=”alignnone” width=”600”]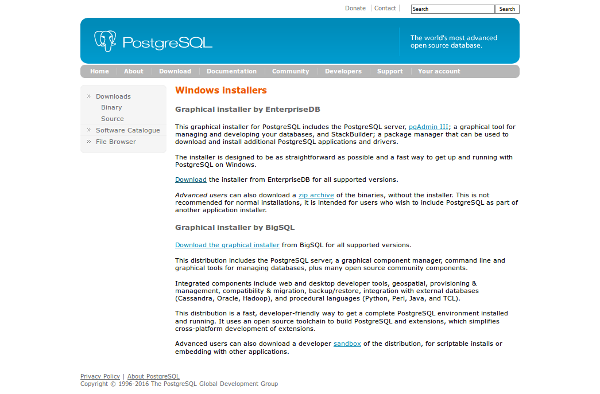 Download PostgreSQL website.[/caption]
Installation wizard starts with a double click on the binary file (as any other Windows program). Then, it allows you to change the values for different configuration parameters: installation directory, data directory, or the communication port. You can change those or use the default values. It is important to remember those values (specially if you change them). Next, the installation wizard ask you for a password (has to be filled twice). This password is for a special user of the database called “postgres”. This user is the default superuser or administrator of the database server. User “postgres” can create new users, databases, etc. It is important to provide a password for security reasons and to remember it, otherwise you won’t be able to make any operation with the server.
[caption id=”attachment_542” align=”alignnone” width=”600”]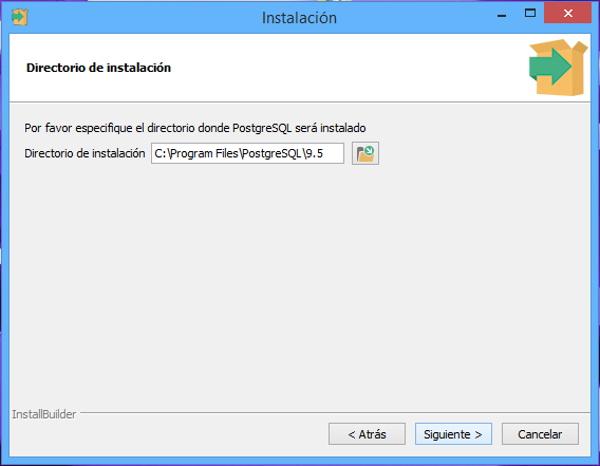 Installation windows to specify PostgreSQL installation folder.[/caption]
[caption id=”attachment_543” align=”alignnone” width=”600”] Installation windows to specify PostgreSQL data folder.[/caption]
[caption id=”attachment_545” align=”alignnone” width=”600”]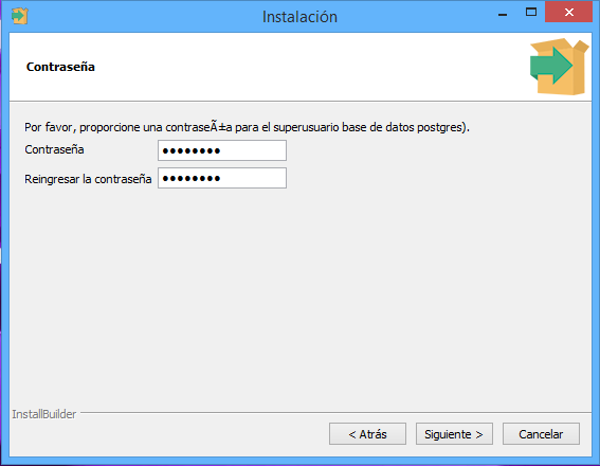 Installation windows to specify the password for postgres user.[/caption]
[caption id=”attachment_546” align=”alignnone” width=”600”]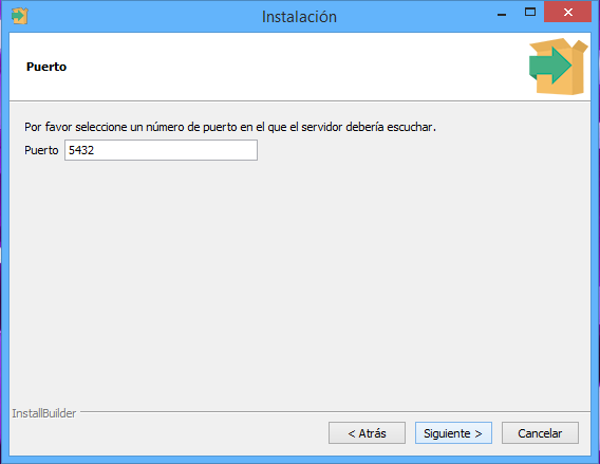 Installation windows to specify communication port number.[/caption]
[caption id=”attachment_547” align=”alignnone” width=”600”]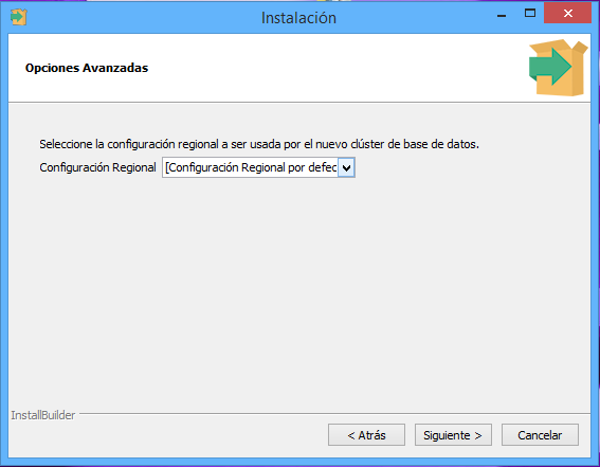 Installation windows to specify regional configuration for the server.[/caption]
When the installation wizard is over, you have to modify the setup in Windows path to include the bin folder in the installation directory of PostgreSQL. This allows you to run PostgreSQL commands in the command line from any folder in your computer. To do so, you need to right click on System, then sequentially click on Properties, Advanced Setup, Env. Variables, System Variables, and Edit. Then, at the end of the text box you have to include the address of the installation directory you especified during the installation wizard plus \bin. If you used the default values it should be something like this:
[sourcecode]; C:\Program Files\PostgreSQL\X.X\bin [/sourcecode]
Note that the directory address has to be separated by semicolumn (;) from the rest of directories in your system path. Note also that X.X has to be changed to match the version of PostgreSQL you installed.
Ubuntu
Ubuntu, and most Linux distributions, include PostgreSQL server in their package repositories. Hence, installing PostgreSQL server is straightforward with the default package manager of the distribution. In Ubuntu, you can use Synaptic to search for the postgresql package and the pgAdminIII package. Installing these two packages should install the server and all necessary dependencies, and setup the required configuration. Here, the installation will create a superuser (or administrator) account called “postgres” in the server and will ask you to specify a password for this user. It is important to provide a password for security reasons and remember it, otherwise you won’t be able to make any operation with the server.
Download EPD data for PostgreSQL
Now you have to download the lastest version of the EPD for Postgres from http://www.europeanpollendatabase.net/data/downloads/. Save the file epd-postgres-distribution.zip in a specific folder of your choice and unzip the file. Now you should have four files dumpall_epd_db.sql.gz, dump_epd_db_schema_only.sql, dumps_epd_all_tables.zip, and README. The file dumpall_epd_db.sql.gz is also compressed and has to be uncompressed to obtain the file dumpall_epd_db.sql.
[caption id=”attachment_538” align=”alignnone” width=”600”]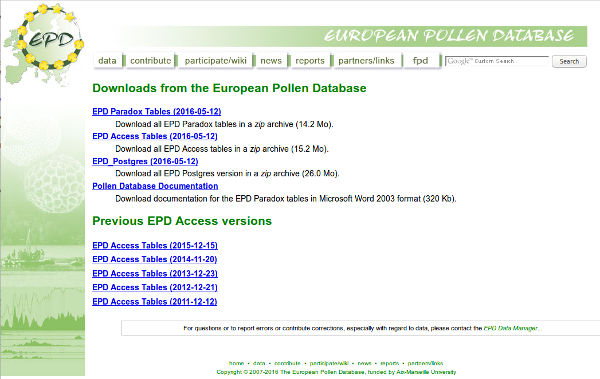 EPD website for downloads[/caption]
Setup PostgreSQL for EPD:
Before we can dump the EPD data into the server, you need to perform two basic configuration steps:
- Create two specific users in the PostgreSQL server
- Create an empty database in the server
These two steps can be done from the command line or from the graphical user interface pgAdminIII.
Command line
Once you are in the command line, use command cd to change to the same directory you unzipped the database files.
[sourcecode]diego@server:~$ cd epd-postgres-distribution [/sourcecode]
Then, use the psql command to start working with the PostgreSQL server, which will change the prompt to let you know you are in a PostgreSQL prompt. Specifically, you specify that want to connect to the server with the superuser -U postgres and the address of the server (-h localhost).
[sourcecode]diego@server:~/epd-postgres-distribution$ psql -U postgres -h localhost Password for user postgres: psql (9.5.3) SSL connection (protocol: TLSv1.2, cipher: ECDHE-RSA-AES256-GCM-SHA384, bits: 256, compression:off) Type “help” for help.
postgres=# [/sourcecode]
Create mandatory users for EPD
First, you should create two specific users in your local PostgreSQL server: wwwadm and epd. These two users are defined in the original EPD database server and are required to properly dump the data into the database in your local server. Users in PostgreSQL are also know as roles. To create a new role for the server we use the CREATE ROLE command, with the argument WITH PASSWORD to specify the desired password for each user. You can use any password of your choice, but do not forget these passwords.
[sourcecode]postgres=# CREATE USER wwwadm WITH PASSWORD ‘wwwadm_password’; CREATE ROLE postgres=# CREATE USER epd WITH PASSWORD ‘epd_password’; CREATE ROLE [/sourcecode]
Create a database for EPD into the server
Now, you can create a database for the EPD with the CREATE DATABASE command. In the example, we created a database called epd but you can select a different name if you want. Note that commands in postgresql prompt end with semicolom ;.
[sourcecode]postgres=# CREATE DATABASE epd; CREATE DATABASE [/sourcecode]
pgAdminIII
pgAdminIII is a graphical user interface to manage PostgreSQL servers. It eases basic operations with PostgreSQL databases for no-advanced users that are used to work with the command line. It is also usefull to visually inspect tables in the database. If you want to give it a try or use it instead of the command line, you should look for pgAdminIII in your system and run it.
The program interface have three different parts: a side bar pannel in the left (Object browser) with the structure of the server and all its elements (databases, users, etc) and two pannels at the right. The right upper pannel provides details (Properties, Statistics, Dependencies, and Dependents) for the element that is selected in the left pannel and the right bottom pannel (SQL pane) shows text details of the selected element in SQL language.
[caption id=”attachment_539” align=”alignnone” width=”600”]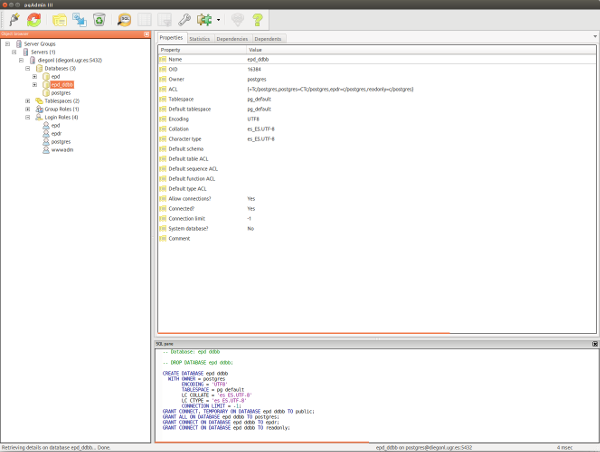 PGAdmin III[/caption]
Create mandatory users for EPD
To create new users (or roles) you have to right click on Login Roles element in the Object browser pannel and, then, left click on New Login Role.... A new window popup. In the first tab of the window (Properties) you have to provide a Role name, which is just the name for the new user. Here, you have to write epd. In the next tab (Definition) you have to provide twice the password for the new user. You can use any password of your choice. Do not change any other option in this window and click Ok.
Repeat the same proccess to create a new role called wwwadm.
Create a database for EPD into the server
To create a new database you have to right click in Databases element in the Object browser pannel and, then, left click on New Database.... A new window popup. In the first tab of the window (Properties) you have to provide a Name for the database. You can use any name of you choice, but it is a good practice to provide an informative name (e.g., epd). Do not change any other option and click Ok.
Dump EPD data into the new database
Dumping EPD data into the DDBB server requires to use the command line, and cannot be accomplished in pgAdminIII. To do so, once you are in the command line, use the cd command to move into the same folder you downloaded and uncompressed the EPD database for PostgreSQL. Then, you use the psql command to connect to the epd database in the PostgreSQL server as the postgres user. In the same line of code you use the < symbol to parse all the dumpall_epd_db.sql script for PostgreSQL into the database you just created (epd).
[sourcecode]diego@server:~$ cd epd-postgres-distribution diego@server:~/epd-postgres-distribution$ psql -U postgres -h localhost -d epd < dumpall_epd_db.sql . . . REVOKE REVOKE GRANT GRANT REVOKE REVOKE GRANT GRANT REVOKE REVOKE GRANT GRANT REVOKE REVOKE GRANT GRANT REVOKE REVOKE GRANT GRANT diego@server:~/epd-postgres-distribution$ [/sourcecode]
Now, you can use the database from the pgAdminIII software or using the EPDr package for R.